Vauss
Portfolio and Personal Services WordPress Theme
- created: 09/05/2018
- by: payo-themes
- Support Don't forget to send us in email, images with issue in case, your url, purchase code.
Cheers
Installation
INFO:
- How to install
Install manual
Download the WordPress installation package
To start the installation process, first you need to download WordPress
from it's official download page. We recommend that you always download
and install the latest stable version of WordPress.
Once you click on the Download button for the latest WordPress version,
the installation package will be saved to your hard disk. Locate the
installation package that you've just downloaded and extract it to a new
folder.
Upload the WordPress Files to Your Server
Now, you need to upload the extracted files and folders to your web
server. The easiest way to upload the installation files is via FTP.
Once the download is complete, extract the archive and upload it to
your web hosting account. You can do that via FTP using a client
application like Filezilla or via cPanel -> File Manager -> Upload
file(s). If you want this WordPress installation to be main for your
website, the files should reside in the public_html folder of your
account. However, you can always make a subfolder (i.e.
public_html/blog) if you want to run only part of your website on
WordPress.
Create a MySQL Database for WordPress to use
Now, you need to create a MySQL database and assign a user to it with full permissions
Once you create your MySQL Database and User, make sure you write down
the database name, database username and password you've just created.
You will need those for the installation process.
Go through the installation process
Now it's time to navigate to your website to start with the
installation process. If you have uploaded WordPress in your public_html
directory you'll need to go to http://yourdomain.com in your preferred
browser. The first thing you will notice is a message, telling you that
you don't have a wp-config.php file and you should create one. Just
click on the Create a Configuration File button to proceed.
On this page you will see a message, asking you to prepare the
necessary information for the installation. Since we already have this
information, simply press the Go! button.
Enter the details for your newly created MySQL database and press the Submit button
WordPress will now check if your settings are correct. If you have
entered all the necessary information, you will see a confirmation
screen. Press the Run the Install button to proceed.
On the next screen you will have to enter the information about your
administrative username and the title of your new site. In addition, you
can specify whether you'd want search engines to index your site or
not. Once you fill in that information, press the Install WordPress
button. Bear in mind, however, that you should specify a real email
address. It can be later used in case you forget your password.
Now, login in to your wp admin, click on Appeareance - Themes - Add new - Upload LayersWp Theme - Skip setup - Upload vauss Theme - Activate.
Check your plugins that needs to be installed, install and activate them.
For customs, please check Appeareance - Customize
Setup vauss
For setting/customisation you need to choose Appeareance - Customize, here you can add logo, add extra css custom, add widgets and many more. Video: https://screencast-o-matic.com/watch/cFhjltbt5Q
Footer section: Here we use sidebar footer: Go to widgets WordPress admin section, add editor box here paste code from file widgets.txt
You can install on subdomain and use our Importing file (will import all pages, posts, products, all we have in demo, without widgets, those widgets, you need to add them manually.)
Css classes
In themes/vauss-wordpress/assets/css/style.cssPlease see this short video for example: https://screencast-o-matic.com/watch/cFhjlVbtpm

title_vauss
line 6613
about_us
line 5572

line 6506
html widget with code
<div class="team-box">
<div class="team-img">
<img src="http://vauss.payo-themes.com/wp-content/uploads/2018/04/team02.jpg" alt="">
<div>
<ul>
<li><a href="#"><i class="fa fa-facebook-f"></i></a></li>
<li><a href="#"><i class="fa fa-twitter"></i></a></li>
<li><a href="#"><i class="fa fa-pinterest"></i></a></li>
</ul>
</div>
</div>
<h6 class="heading-uppercase">Robert Vincent</h6>
<span>CEO</span>
</div>

Html widget with code, also can be found in vauss-wordpress/assets/css/style.css 6789 line
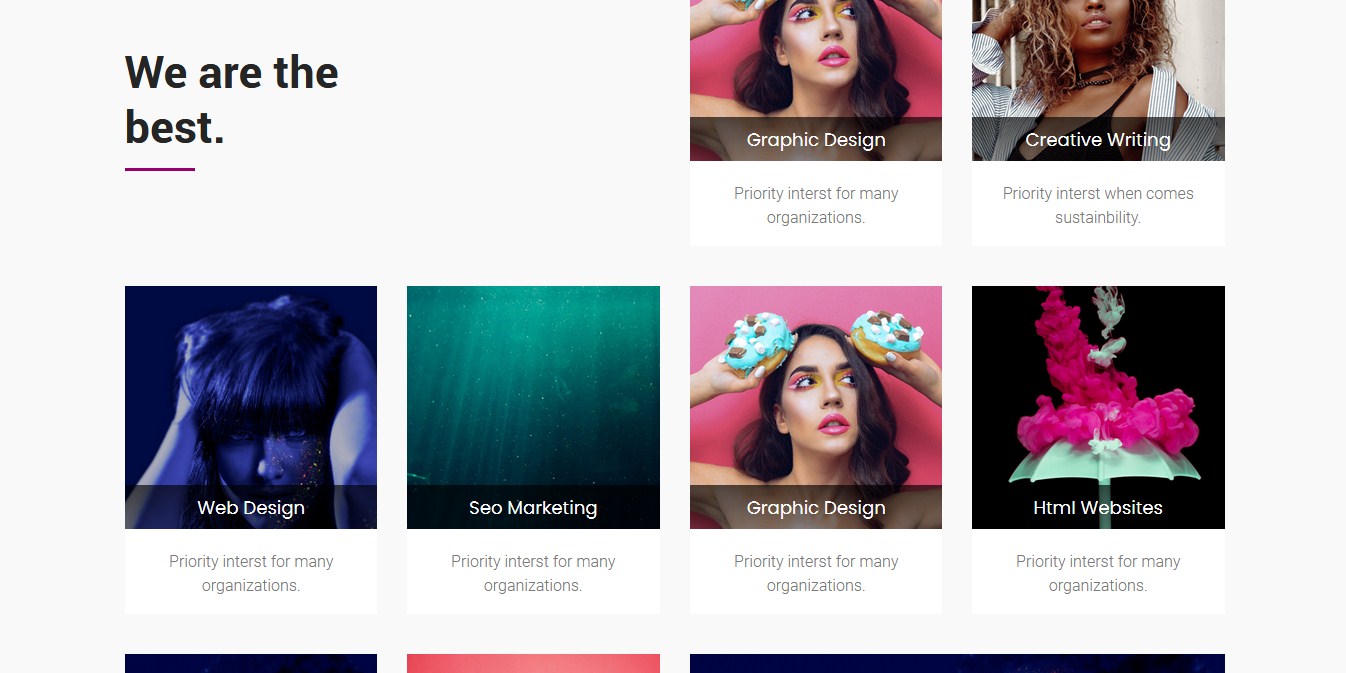
<div class="single-service-item text-center">
<div class="img-holder">
<img src="http://vauss.payo-themes.com/wp-content/uploads/2018/05/vauss-top01.jpg" alt="Awesome Image">
<div class="inner-content">
<h3><a class="title" href="#">Graphic Design</a></h3>
<div class="text">
<p>Priority interst for many organizations.</p>
</div>
</div>
<div class="overlay">
<div class="box">
<div class="content">
<div class="overlay-content">
<div class="icon-holder">
<span class="et-icon-paintbrush "></span>
</div>
<h3><a class="title" href="#">Graphic Design</a></h3>
<div class="text">
<p>Great explorer of the truth, the master-builder of human happiness. No one rejects, dislikes, or avoids pleasure itself pleasure.</p>
</div>
<div class="read-more">
<a href="#">Read More</a>
</div>
</div>
</div>
</div>
</div>
</div>
</div>
Click on Settings icon, choose edit row, here click on 1 column go to Cell 1 Styles add your image in tab Design and in tab Attributes in cell class add rowhover. this you can edit in the same style.css on line 7114
<div class="single-service-item text-center">
<div class="img-holder">
<img src="http://vauss.payo-themes.com/wp-content/uploads/2018/05/vauss-top01.jpg" alt="Awesome Image">
<div class="inner-content">
<h3><a class="title" href="#">Graphic Design</a></h3>
<div class="text">
<p>Priority interst for many organizations.</p>
</div>
</div>
<div class="overlay">
<div class="box">
<div class="content">
<div class="overlay-content">
<div class="icon-holder">
<span class="et-icon-paintbrush "></span>
</div>
<h3><a class="title" href="#">Graphic Design</a></h3>
<div class="text">
<p>Great explorer of the truth, the master-builder of human happiness. No one rejects, dislikes, or avoids pleasure itself pleasure.</p>
</div>
<div class="read-more">
<a href="#">Read More</a>
</div>
</div>
</div>
</div>
</div>
For all of this, you can find them in Import folder, also you can Import entire Page in page builder.
Shop css starts on 1055 line
Post title blog 2558 line
On line 3641 css class contact-page
Form contact is in Import folder

Widgets footer area

.title-container .title in themes vauss-wordpress/style.css on line 287
Image for title area is in themes\vauss-wordpress\assets\images
Note:
Import all content using from Import folder - demo_import_all.xml
WordPress as defaut have limitation in Import, so you need to speak with your host to make limit upload bigger, and maximum execution, to be bigger then default.
In Import folder you can see: demo_import_all.xml - this file will import all posts, pages, products, menu, page builder pages, etc
If you have slow server, you can try to import one by one from folder import - demo_import_one_by_one, or install on localhost and use Akeeba Backup and then install on your server,
Repeat: this issues is not from our theme, is only from server limitation.
Css classes : css classes are words (classes) that you can add them in siteorigin page builder - addon- Widget Styles -in Atribute field and those classes are added in css file and customised. Why? because some page builders don't offer all functions to choose color, font, size, etc so we add this class to customs. Example in addon we have css class Widget calltoaction01 in css file we can find
How to change colors in theme:
Using style.css from themes/vauss-wordpress/assets/css/style.css and debugger from Firefox or Chrome, you can find fast, line in style css, where to change.How to import a page in siteorigin builder
Please see this video: https://www.youtube.com/watch?v=s5zfu_bKknE
Update
How to make update?
You can use FTP and in theme folder in vauss-wordpress, you will need to add new files.
Download latest version of vauss, unzip, go to theme, copy all files and paste to old ones. Also you can check here http://docs.layerswp.com/doc/update-layers/ how to update layerswp theme framework.
Dont forget, first make backup.
Documentation Page builder
What is inside
In vauss pack you will find:
theme, plugins, import files, documentation
Features
SiteOrigin Builder
Slider Revolution
Based on Layers WP
Premium Quality Theme
Fully Responsive Layout-Desktop, Tablet, Phone etc.
Custom Post Type Carousel Slider, Portfolio, Pricing Table, Services, Tabs, Accordions.
Portfolio Filter
Parallax Background
Powerful theme options panel based on LayersWP framework with tons of options.
Option to custom CSS and JS
Pages slidebar
Custom Homepage
Custom header
Post views
100% SEO Optimized
CSS3
Pagination
404 theme
Google Fonts
and more...
Plugins
LayersWp
SiteOrigin panels
Woocommerce
Livemesh SiteOrigin Widgets
Slideshow Gallery
WooCommerce Menu Cart
Images and video are from pexels.com